Malware Analysis - IcedID
This blog post is available in french here.

Summary
- Introduction
- Recon
- Overview
- Analysis
- 1) Stage 1
- 2) Stage 2
- A) Unpack
- B) Privilege escalation
- C) Svchost.exe injection
- 3) Stage 3
- A) Process dump
- B) Errors and exeption handler
- C) C2 URL extraction
- 1) OSINT divorought.com
- 2) OSINT percalabia.com
- D) Information gathering
- E) Persistence method
- F) Local proxy
- G) Anti-VM and anti-debug
- H) Exfiltration
- Indicators of compromise
Introduction
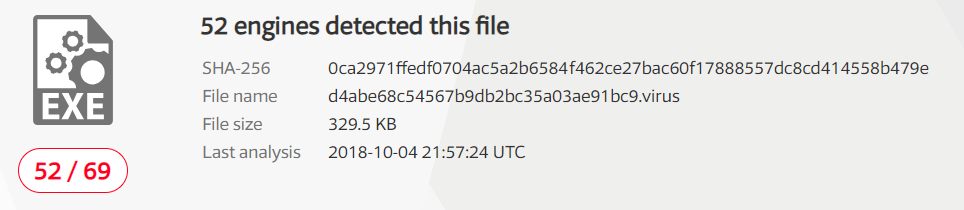
The analysed sample is the following:
d4abe68c54567b9db2bc35a03ae91bc9
This one can be downloaded on Malshare or on VirusBay.
Unlike my previous blog post regarding the Dexter sample, this malware is younger (first seen the 17 April 2018) and much more aggressive. Be careful while downloading and manipulating this file. The binary file must be launched inside a controlled environment, with no gateway to other physical computers. IcedID is able to spread itself through shared files.
Recon
VirusTotal labeled this file as malicious, and many anti-virus are able to identify the “IcedID” malware’s family :
 One of the AV is even able to tell that this sample is going to inject itself into another process:
 • The sample is not packed, but one of the PE section have a high entropy, which lead to the conclusion that a second resource may be packed/cipher inside the first one.
• The strings inside the sample are ordinary, and almost useless.
• In order to start my analysis somewhere, I’ve launched the malware while monitoring the systems events with procmon, and while checking the process with procexp, to help me gain a first overview of what’s going on with this malware. During the launch time, the malware is injected into a new copy of itself, just before setting up a suspect svchost.exe process:
 This injection is my starting point.
Overview
Analyse
Stage 1
The malware begins by injecting itself into a new process that have the same name as the original malware process. In order to dump it, the WriteProcessMemory, VirtualAlloc, CreateProcess and CreateProcessInternal API need to be monitored. Those are the most common API related to process injection:
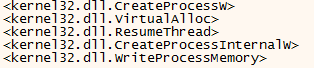 Without surprises, a new process is launch with the same name that the analyzed sample:

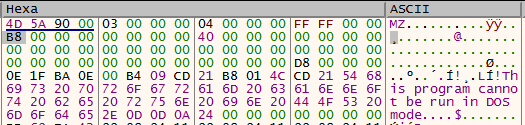
 The WriteProcessMemory is then launched. This function is used to write the new process in memory, which is a way for us to dump the new process content. This dump is a valid PE file:
 The dump can be extract by tracing back the memory layout where the process lives in (“follow in memory dump” under x64dbg) then extract it (“dump memory to file”).
The header of the new dumped file need to be adapted by changing the virtual memory address and size to make them match with the physical ones. By doing this, the file is going to be in an unmapped format (unmapped files can be used on a disk, where the mapped format is for memory file):
The dump can be extract by tracing back the memory layout where the process lives in (“follow in memory dump” under x64dbg) then extract it (“dump memory to file”).
The header of the new dumped file need to be adapted by changing the virtual memory address and size to make them match with the physical ones. By doing this, the file is going to be in an unmapped format (unmapped files can be used on a disk, where the mapped format is for memory file):
Stage 2
A) Unpack
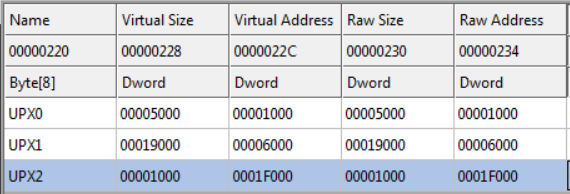
As the section’s name suggest, the stage 2 dump of the malware seems pack with UPX.
Unfortunately, it will be needed to unpack it by hand:
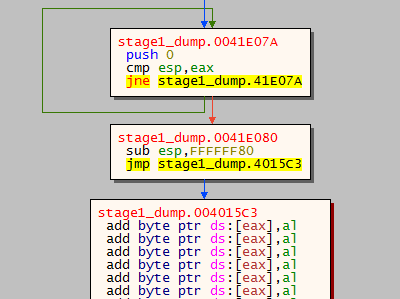
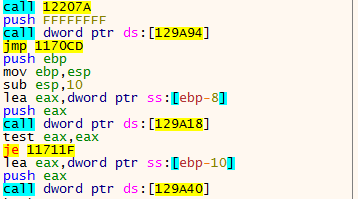
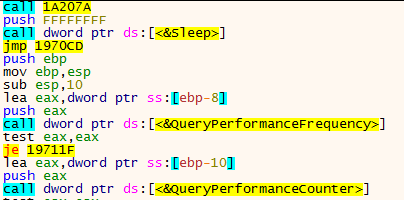
 As a reminder, the goal here is to find the jmp instruction that point to a far away memory space. This memory space is going to be the EOP of the second stage of IcedID. If in doubt, i advise you to read one of my previous blog postst about manually unpack UPX file.
The relevant jmp can be found by looking at the code’s graph:
As a reminder, the goal here is to find the jmp instruction that point to a far away memory space. This memory space is going to be the EOP of the second stage of IcedID. If in doubt, i advise you to read one of my previous blog postst about manually unpack UPX file.
The relevant jmp can be found by looking at the code’s graph:
 Once the address of that jump extracted, the dump can be made on that content. I’m using the Scylla x64dbg plugin.
This plugin make life easier by allowing the recovery of the IAT by dynamically rebuilding the API imports.
Once the address of that jump extracted, the dump can be made on that content. I’m using the Scylla x64dbg plugin.
This plugin make life easier by allowing the recovery of the IAT by dynamically rebuilding the API imports.
B) Privilege escalation
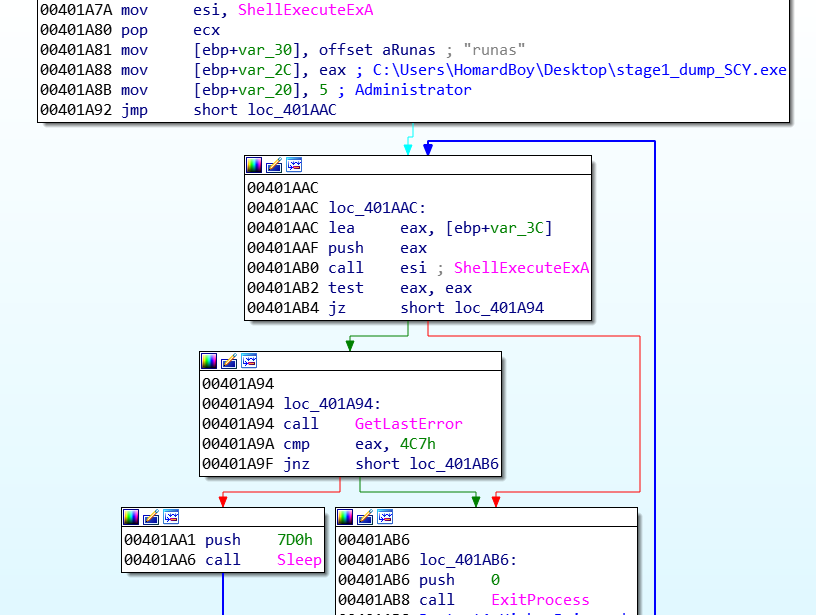
To begin with, the Windows’s version is gather with the RtlGetVersion API, then the privilege level is checked. If the privileges are not high enough, the malware re-launch itself with the “runas” command:
 In response, a UAC window asking for administrator’s privileges is trigger

C) Svchost.exe injection
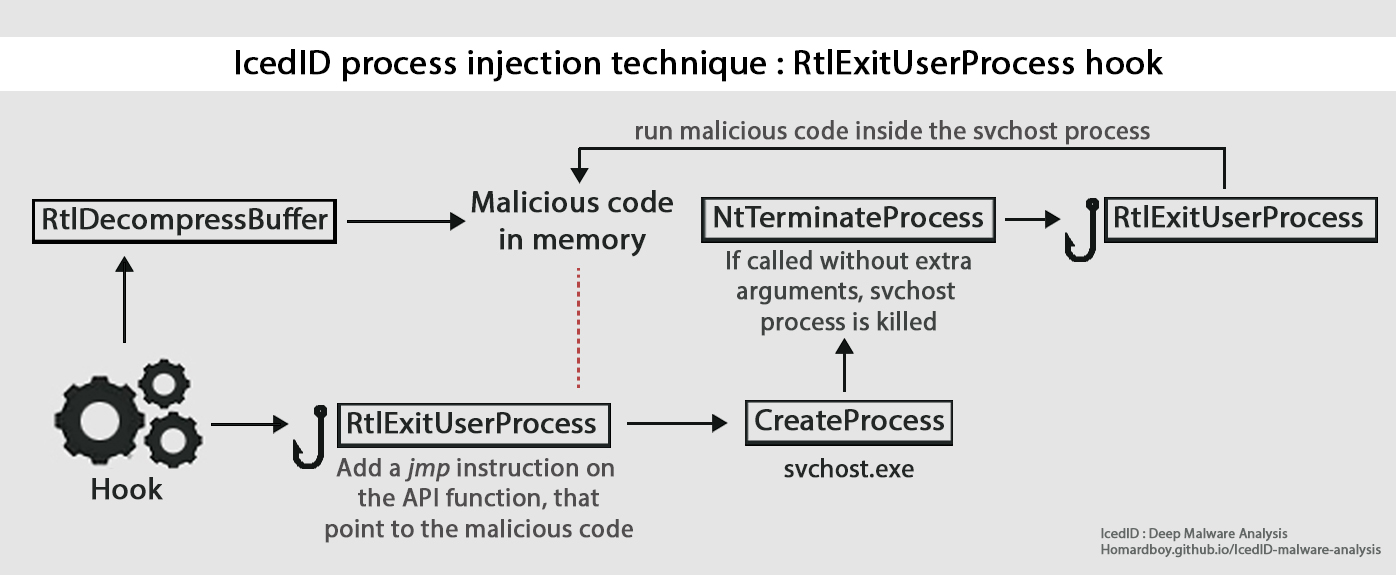 In order to inject itself into svchost.exe, IcedID is hooking the RtlExitUserProcess function.
First, a buffer containing the malicious code is extract in memory.
In order to inject itself into svchost.exe, IcedID is hooking the RtlExitUserProcess function.
First, a buffer containing the malicious code is extract in memory.
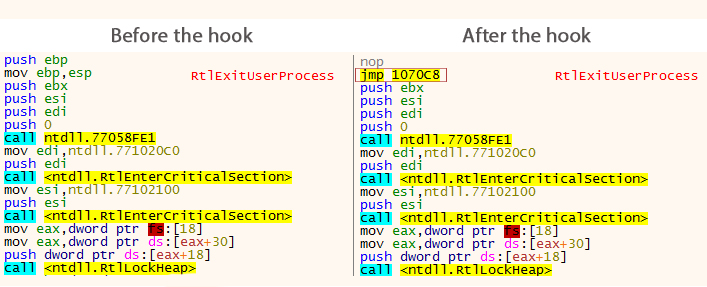
The RtlExitUserProcess function is hooked. The hook aim to modify the function’s code by adding a jmp instruction into it. This jmp is pointing to the buffer containing the malicious code extracted at the previous step:
Next, the CreateProcess function is call with one unique argument : svchost.exe. The malware author add a touch of obfuscation by building the svchost string by pushing the characters one by one on the stack:
 When a svchost process is called without further arguments, this one is automatically closed by the operating system. That’s what is happening here, and the NtTerminateProcess is call by the OS. The RtlExitUserProcess is then call by the NtTerminateProcess function. This last action lead to the execution of the malicious code, because of the jmp that have been added with the hook.
By using this method, the svchost process is kept alive, and is running the malicious code injected by the malware:
 Debugging an injected process mean attaching a debugger on it on the fly, and monitoring the RtlExitUserProcess function in order to get the address of the jmp injected by the hook. At this memory address is the core functionality of the IcedID malware.
Stage 3
A) IAT rebuild and process dump
Reversing the injected malicious code is only possible with a copy of this code. But there is an issue : the syscalls are not populated in this section:
 All of the calls are pointing to a nulled memory space:
 The IAT may be build dynamically in this memory section. By blindly executing the first functions of the injected code, all of the syscalls are resolved by themselves:
 Some of the syscalls are not populated and are pointing into another memory area. This memory space is also going to be needed while performing the static analysis.
In order to analyze the injected code, both of the memory layout will be opened in IDA. Some tools may be handy when it comes to populate syscalls, like APIscout.
B) Errors and exeptions handler
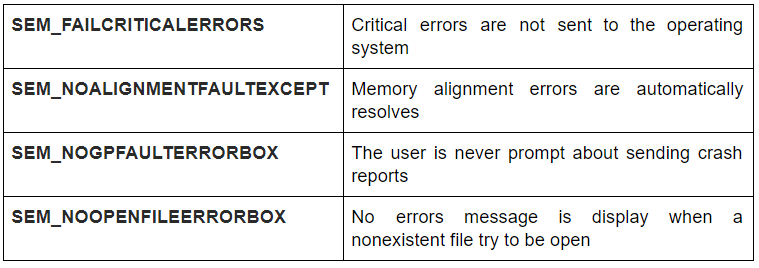
If the malware want to stay hidden on an infected system, IcedID start by hiding the system’s errors that can be display to the user. When the SetErrorMode function is call with the 0x8007h argument, all of the errors messages stay hide:
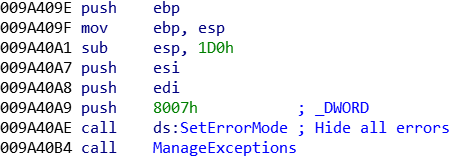 In case of a crash or any issues caused by the malware, the user is not going to be notified. More precisely, those mods are hide:
C) C2 URL extraction
The C2’s URL are dynamically extracted from the malware’s configuration by a deobfuscation function:
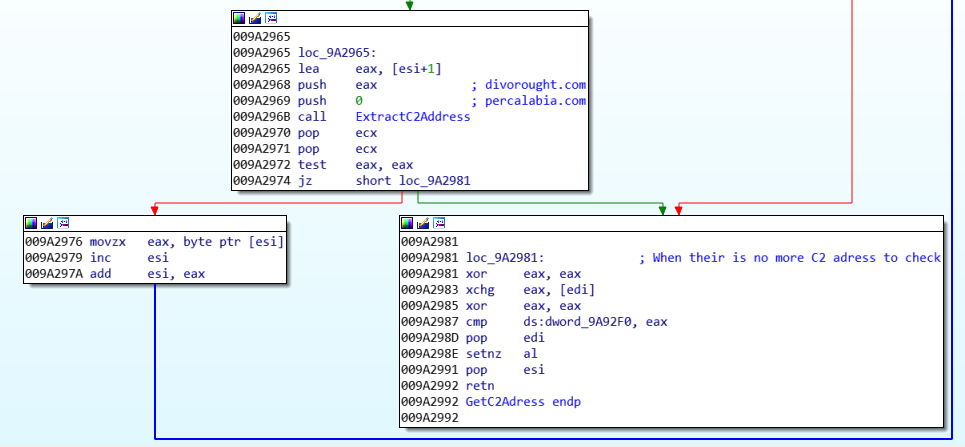 This sample is able to extract two URLs:

1) OSINT divorought.com
At the time of writing, this address is not alive anymore.
However, this URL was active during mid-april 2018, and had some malicious related activity:
 This one is related to the IcedID campaign, the Emotet one, but also Hancitor-malspam.
The domain name recording was made with the following data:
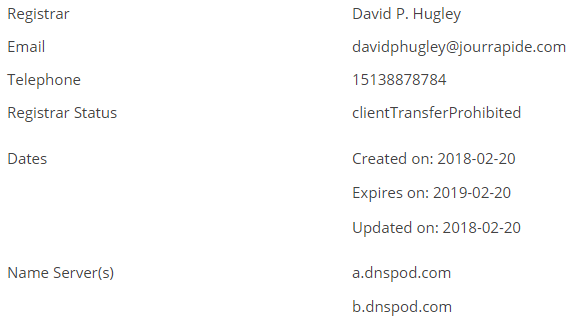 This mail address was used for registering a lot of domain names, that are often related to malicious activity linked to IcedID or Emotet.
2) OSINT percalabia.com
Without surprises, this domain name was also registered with the same account that the previous one:
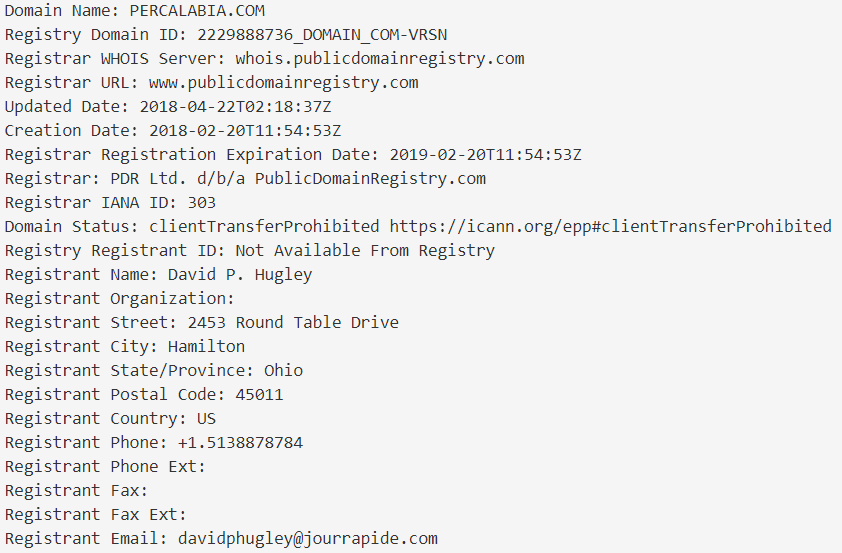 This address is also linked to the IcedID and Emotet campaign.
Those two extracted URL are closely linked, and are used as a point of control by the IcedID operator.
D) Information gathering
Like every other Trojans, IcedID is looking for juicy information on a newly infected computer. But here, it is done in a sparingly way.
First, the SID (Security Identifier) is retrieve, along with the computer and session’s name:
 The Windows version is then gather with the help of the RtlGetVersion function:
 Some more information related to the computer architecture and about the security token are also gathered:
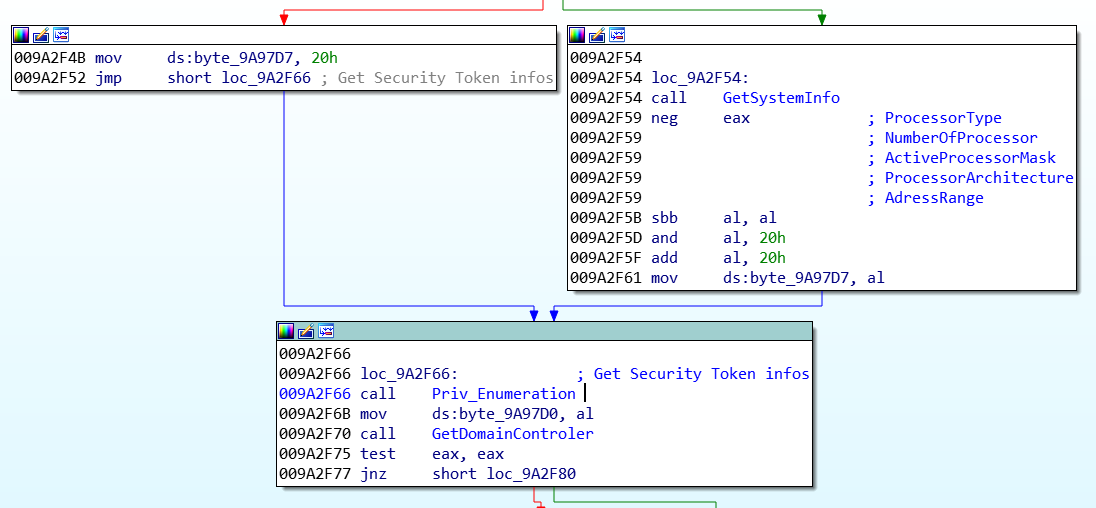 At the end, the address of the domain controller (if there is one on the network) is found with the NetGetDCName function:

E) Persistence method
IcedID is using a not so sophisticated technique that is highly efficient. A fake update service is added into the task scheduler. This task is triggered each time a user is logging into the system. This update service is a simple copycat of the stage 2 malware.
IcedID start by generating a random name that is going to be used for the file call by the task scheduler:
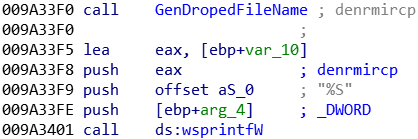 In my case, this file is called “denrmircp.exe”.
Then, the malware is looking for an already existent random folder under \AppData\Local\. The dropped file is going to be placed here, inside a random folder:
The fact that IcedID is using a random executable name and the fact that it is dropped under an existing folder is increasing the confusion that a user can feel while stepping into that folder and seeing the malware’s executable file.
The scheduled task is then created, from the actual user’s account, with the “Update” name and “Check update” description:
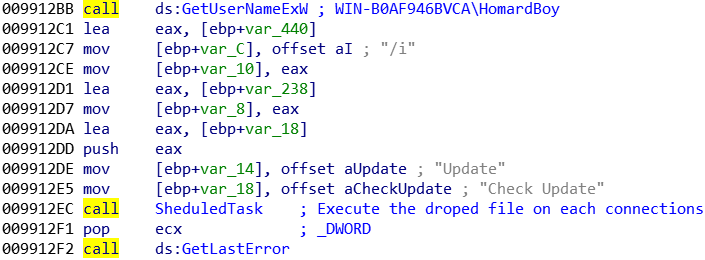
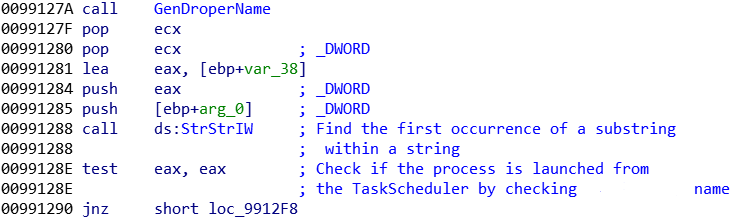
In order to check if the persistence method should be execute or not (in the case of an already infected computer, this malware is not using any mutex system), a comparison is made between the launched file’s name and the randomly generated name. If the names are matching, the malware knows that it process was launched from the task scheduler, and that it’s not the initial infection step:
F) Local proxy
IcedID is acting as a man-in-the-middle proxy between each browser’s requests, on the loopback interface. To keep a low profile, this sample is extracting a PCA certificate (Primary Certificate Authority) from it configuration. This certificate is going to allow the malware to sign the intercepted HTTPS web requests, without notifying the user.
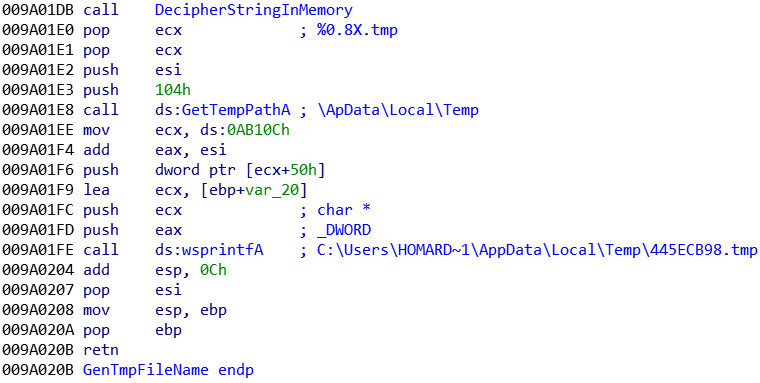
The certificate is dynamically built, in a file under \AppData\Local\Temp\[A-Z0-9]{8}.tmp:
 It’s a VeriSign certificate from 2006:
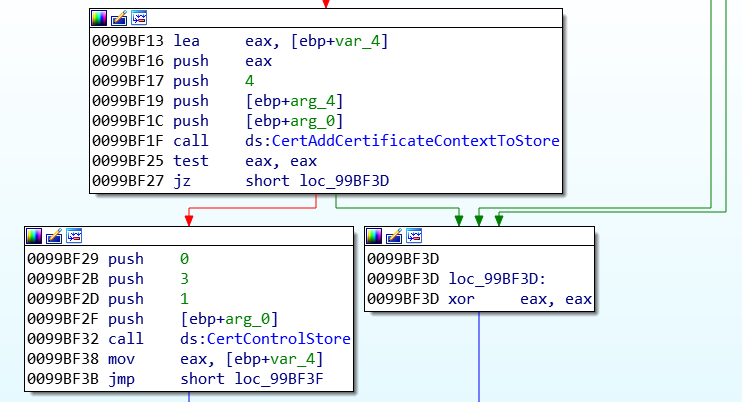
 The content of that certificate is then generate, and this one is added into the Windows certificate store:
 Then, the local proxy is set up:
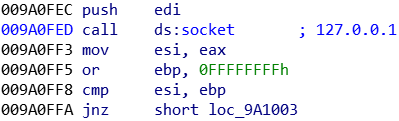

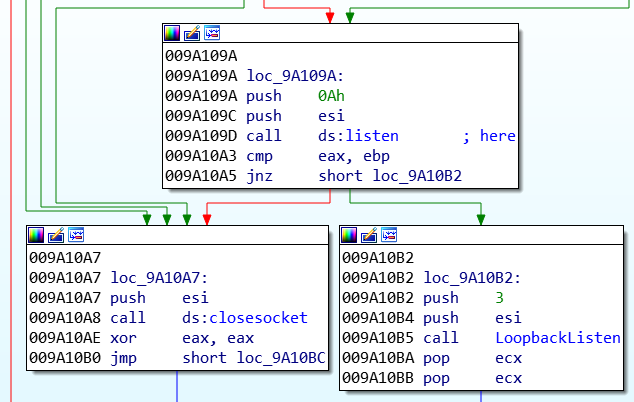 This proxy is initiate on the TCP loopback address (127.0.0.1), port 5000:
 An array of domain name to spoof is extracted from the configuration, then cipher and hide on a register key under “\SOFTWARE\Classes\CLSID{B2C9B96F-A3E9-0806-9617-338F1ECD9918}”. The malware is now ready to gather some financial credentials.
G) Anti-VM and anti-debug
Oddly, this sample is not actively looking for virtualized environments. It is just checking for some debugger and VM artifacts in order to notice the C2 server, but the detection of a debugger or of a virtual machine is not going to crash the sample or leading to the loose of any kind of information.
Two techniques are used by IcedID.
• The CPUID instruction return some data about the processor:
 By calling it with the 40000000 value into the EAX register, some information about the virtualization vendor can be leaked. The anti-vm function is build that way:
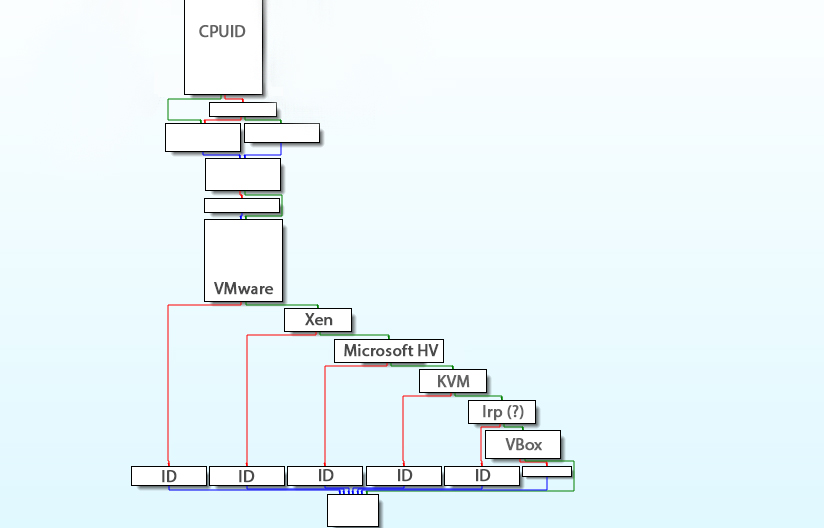 Based on the used technology, a value is given to the computer. From 0x0 to 0x4 for a usual computer, from 0x4 to 0x7 for a VMware machine, and so on…
• The RDTSC instruction return a timestamp related to the processor. By calling this instruction two time in a row, but by letting some running between, it is possible to compare the time needed to execute those instructions. If this time is too high, it shows that he code may be run manually into a debugger.
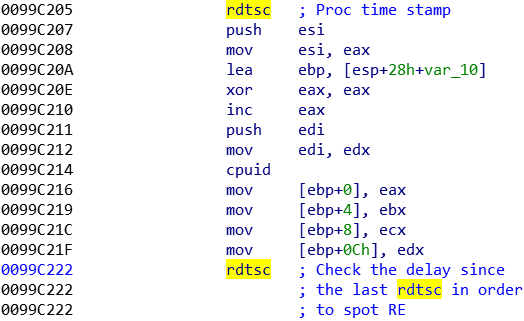 The RDTSC instructions are strategically placed around the CPUID instruction. It prevents the analyst from changing the CPUID returned value and fooling the malware. Hopefully for us, it’s useless, and we can change this value later.
H) Exfiltration
A network related thread with some exfiltration capability is created by IcedID:
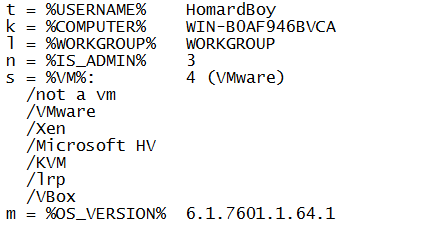
 In order to initiate the communications with the C2 server, some needed information are extracted. Those information are related to the computer name, the workgroup and the username:


 Those are URL encoded:


 A POST request is then created with the gathered data. A letter is associate to each one of those data:
 Everything is passed as a parameter for this request:
 At the end, everything is send to the C2 servers.
The control server is now able to answer to the malware’s client and to send some precise instructions. IcedID is then going to download some additional modules from the C2 server when asked.
The given sample does not have online C2, so I’m not able to perform any analysis on the external IcedID modules.
The instructions requested by the control server are the following:
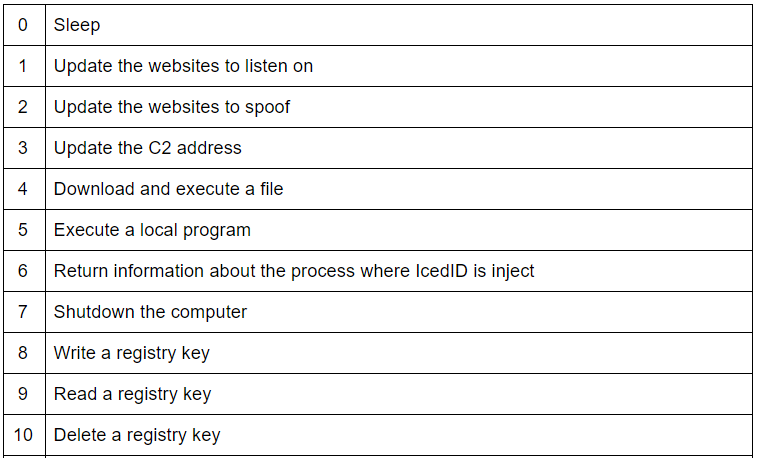

The malware enter in sleep mode, while listening for instruction coming from the C2 server, or for any stolen credentials to exfiltrate.
Indicators of compromise
Stage 1 (Injector) hash : d4abe68c54567b9db2bc35a03ae91bc9
Stage 2 (UPX unpacked) hash : 4ad54337918cd6e6c77eae69f68da239
C2 server : 46.148.26.106 - divorought.com
C2 server : 5.187.0.158 - percalabia.com
Http request : POST */*.php?a=[0-9]&b=[A-Z0-9]{17}&d=[0-9]&f=[0-9]&g=[0-9]
Filesystem : C:\Users\%USERNAME%\AppData\Local\%RANDOM_DIR%[a-z]{9}.exe
VeriSign certificate : C:\Users\%USERNAME%\AppData\Local\Temp\[A-Z0-9]{8}.tmp
Scheduled task : “Update”, “Ready”, “session opening”, “launch a programm”, “C:\Users\%USERNAME%\AppData\Local\%RANDOM_DIR%\[a-z]{9}.exe”